Canva is a simple way to create artwork for your printed products. Follow the steps below to set up your design correctly and export it in a format suitable for print.
Before you send your artwork to us check that...
1. Set up your design at the correct size
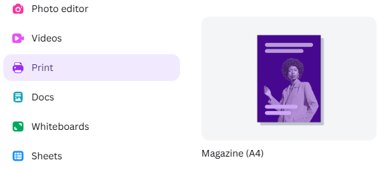
Before you start designing, make sure your Canva document is the same size as the finished printed product.
For example, if your finished flyer is 210 × 99 mm, set your Canva design to 210 × 99 mm.
If you’re unsure what size to use, check your quote or ask us before creating your artwork.
Tip: For custom products or packaging, the required artwork setup may be different. Please check with us first.
2. Allow for bleed
If your background colour, image or other design element goes right to the edge of the finished product, it needs to extend beyond the trim area.
Quality Press requires 3 mm bleed on all sides unless otherwise specified.
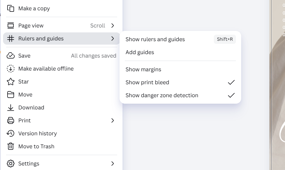
In Canva, you can turn on bleed guides by selecting:
File → View settings → Show print bleed
Keep important text, logos and other information away from the edge so they aren’t too close to the trim.
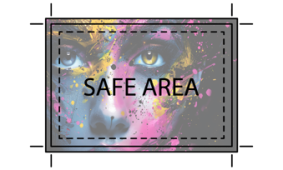
3. Keep important elements inside the safe area
Don’t place important text, logos or other key information too close to the edge of the design.
As a general guide, keep important elements at least 5 mm inside the finished edge, unless your project has different requirements.
This helps prevent important information from being trimmed off or appearing too close to the edge.
4. Use good-quality images
For the best print results, use high-resolution images.
Images should ideally be around 300 dpi at their final printed size.
Avoid stretching small images to make them larger, as this can make them look blurry or pixelated when printed.
Tip: If your image already looks blurry or pixelated on screen, it is unlikely to improve when printed.
5. Check your colours
Canva designs are created primarily for digital use, so colours you see on your screen may not look exactly the same when printed.
For standard four-colour printing, artwork is produced using CMYK.
If accurate colour reproduction is important, particularly for brand colours, please discuss this with us before preparing your final artwork.
6. Check your artwork before exporting
Before downloading your artwork, check:
Finished size
Spelling and contact details
Logos and images
Text and important elements are safely positioned
Backgrounds extend into the bleed
Nothing important is accidentally hidden or cut off
You are happy with the overall layout
It’s much easier to fix a mistake before the artwork is submitted!
7. Export your artwork for print
For the best print results, use high-resolution images.
Images should ideally be around 300 dpi at their final printed size.
Avoid stretching small images to make them larger, as this can make them look blurry or pixelated when printed.
Tip: If your image already looks blurry or pixelated on screen, it is unlikely to improve when printed.
Canva's own guides
For more information about using Canva’s print features, you can also visit Canva’s official guides:
You don’t need to be a print expert to get your artwork ready for printing.
If you’re unsure about anything, send us your artwork and our team can let you know if there are any issues that need to be addressed before production.